Lighting for Starry Skies
Guidelines and purchase options for your home or community.

We advocate the International Dark-Sky Association’s…
Five Principles for Responsible Outdoor Lighting
If light is deemed useful and necessary, follow these guidelines to prevent, or when that’s not possible, minimize light pollution:
USEFUL – All light should have a clear purpose.
Before installing or replacing a light, determine if light is needed. Consider how the use of light will impact the area, including wildlife and the environment. Consider using reflective paints or self-luminous markers for signs, curbs, and steps to reduce the need for permanently installed outdoor lighting.
TARGETED – Light should be directed only to where needed.
Use shielding and careful aiming to target the direction of the light beam so that it points downward and does not spill beyond where it is needed.
LOW LIGHT LEVELS – Light should be no brighter than necessary.
Use the lowest light level required. Be mindful of surface conditions as some surfaces may reflect more light into the night sky than intended.
CONTROLLED – Light should be used only when it is useful.
Use controls such as timers or motion detectors to ensure that light is available when it is needed, dimmed when possible, and turned off when not needed.
COLOR – Use warmer color lights where possible.
Limit the amount of shorter wavelength (blue-violet) light to the least amount needed. Light where you need it, when you need it, in the amount needed, and no more.
Find Lighting for Starry Skies
The International Dark Sky Association has a Fixture Seal of Approval program for residential and community lighting. Find your starry-sky friendly lighting today:
Find Lighting for Starry Skies
How can I implement lighting for starry skies at home?
Written by Starry Skies South member Dr. William Baker
I will use what I have done with my home outdoor lighting over the years as an example. First, a disclaimer: I am not a lighting engineer. I am just an amateur astronomer who has done my best to educate myself about lighting and light pollution. This is not as hard as it sounds, as there is a lot of good information available on the internet. The International Dark-Sky Association has excellent resources. Their Outdoor Lighting Basics is a great place to start.
First, a few definitions.
- A lumen is the measure of how much light a bulb produces. The higher the number, the brighter the bulb. However you will see LED bulbs listed in “watt equivalents” to indicate the brightness. This goes back to the old incandescent bulb watt numbers. For example, the old 60 watt incandescent bulb put out 800 lumens using 60 watts of energy. For LEDs, it only takes 9 watts to produce 800 lumens. The manufacturers use the term “60 watt equivalents” for the 800 lumen LED to make it easier for people to compare to the old incandescent bulb. You will find the watt equivalent, lumens and true watts all listed in the bulb information.
- Degrees Kelvin is the measure of the color or “light appearance”. The scale goes from ~2,000 K to 6,000 K. Lower numbers yield yellower and “warmer” light color, while higher numbers produce bluer and “cooler” color. “Warm” or “soft white” bulbs are in the 2700 K range, which is what the old incandescent bulbs produced. These are best for family rooms, bed rooms and outdoor lighting. “Cool white / daylight” bulbs are higher on the K scale and are much bluer. These are used in task areas like kitchens, bathrooms and garages. If outdoor lighting is required, be sure to use the warmer bulbs. The less blue in the light, the better for wildlife, you and light pollution.
- Fully shielded light / full cutoff fixtures are ideally what you want for outdoor lighting. Fully shielded or full cutoff means that light does not escape upward. If you are looking at the fixture at eye level, there should not be any “up” light. Technically these terms are not interchangeable, full cutoff fixtures have less glare at certain angles, whereas the fully shielded fixtures do not, but both prevent “up light” and therefore prevent light pollution. For a detailed explanation see this link. Beware as this gets into real lighting engineer territory.
Now, back to what you can do at home.
The totally cost free and easiest option is to just turn off any outdoor light you don’t need. This is a good rule actually for any light, indoor or outdoor. Save that money! You don’t even have to replace the fixture, just turn it off. My sidewalk lamp post, for example, is not a great fixture for controlling LP. While it does have a top cover to at least stop some of the light going skyward and one day, when it needs to be replaced, I will put something better in. For now, I only turn it on when I really need it. I see a lot of lamp posts and porch lights that are on 24 hours a day/ 7 days a week. For those who can’t remember to turn the lights on and off, they do make programmable light switch timers. You replace the old switch with this and set the program. Some switch controls can be operated through your WiFi to control when the light comes on and goes off, whenever you wish. Just be sure when you program your lights, to not leave them all night. Do it for the energy savings, and do it for LP. Otherwise your neighbors and other passersby will be shaking their heads in disbelief that you have your outdoor lights on at noon!
Use the lowest lumen bulbs that will do the job, which also saves money. (This is also a good rule for indoor lights). For security, I have the usual eave-mounted flood lights, but these use the lowest lumens that will do the job, and all of these are directed to where the light is needed, not up in the sky. None stay on all night, and they are just on when absolutely necessary. In walking areas, such as gates, where I may need light at certain times during the evening or night, I installed a motion sensor to control the flood lights. You can now buy just the flood light bulbs with a built in motion sensor that simply screws into an existing fixture or a whole new fixture. They come on with motion and go off after a set amount of time, and you can select, 5, 10 or even 15 minutes. Don’t forget to check the Kelvin rating. These lights are great for security as they come on as a total surprise (my motion sensor lights mainly surprise the racoons).
Replacing fixtures with non light polluting ones. Again, the International Dark-sky Association is a great resource. Another even cheaper option is to install a cutoff shield to an existing fixture. These can be purchased or made yourself. It is easy to spot a good fixture with the general rule of no up light (no light escaping upward), when viewing the fixture at eye level. This light is one of my favorites.
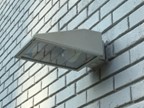
This fixture is mounted above a door used by our kids to enter the house when coming home late. With no “house” structure above it, any non shielded light would cause a lot of LP. I installed this fixture decades ago to replace an old box type lamp. As you can see, it has great light coverage of the entrance, with no up light or light trespass. Its sleek profile and color blends in great with the wall. Even better, it has a glass cover to prevent the bugs from entering the fixture. As you can tell I am really proud of this one and it has held up great. (A tip on bulbs for enclosed fixtures like this one, make sure you purchase a bulb that is rated to be used in an enclosed fixture. These are not hard to find on the shelves locally. The fixture rating is usually written either on the packaging or the bulb itself. Using a non-enclosed fixture rated bulb will shorten the LEDs life span due to heat build up. But, a bulb rated for an enclosed fixture is built to take the heat. The current fixture has lasted for 20+ years.)
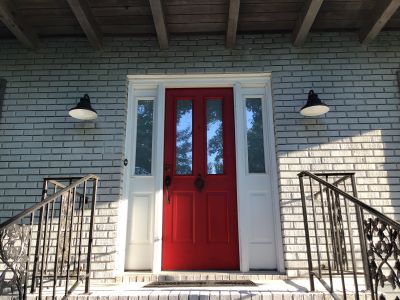
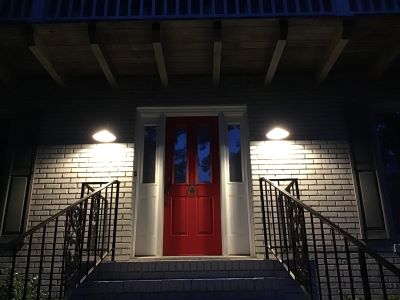
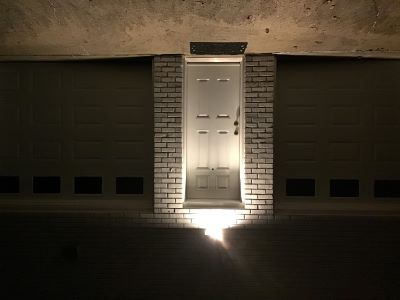
Here is my newest addition. We have been in this house for 33 years. Being frugal, we did not want to change fixtures that weren’t the worst LP offenders. The old light fixtures did produce a lot of up light, but this was blocked by a deck above the front door. Since we only turned on the lights when needed, and used only the lowest amount of lumens, these fixtures were allowed to “stay”. But, one fixture finally developed a short and would no longer turn on. So the time came for replacement. Hurray! We chose full cutoff fixtures that use a standard LED bulb. You can get these with a built-in light source, but if the light source goes out you have to replace the entire fixture. Having a fixture with replaceable bulbs also provides more control over the lumens and Kelvin range. We chose to install our new fixtures with 2700 K bulbs. These fixtures were $69 each. There were cheaper options available, but they did not fit the Boss’s taste (aka: my wife). Life is a compromise: since I was getting a great non light pollution fixture, she got to choose the color and style. As you can see from the pictures, these new fixtures do not produce any up light. They actually provide better illumination of the porch and steps, with less energy usage than the old fixtures. A win-win for our house.
To sum it up, controlling light pollution is basically a “no brainer”, a win-win all away around. You save money, improve your health and that of others, help the environment, and as a bonus, you get a beautiful night sky to enjoy.
Thanks for taking the time to read all this. Don’t forget to pass the word about light pollution to your family and neighbors, as well as your elected and appointed officials.
Starry skies, William Baker, M.D.